
EXCEL SETUP INSTRUCTIONS
How to access your Amazon Seller Central or Vendor Central data in Excel
This page will walk you through setting up direct access to your data in Microsoft Excel, using Open Database Connectivity (ODBC).
1. Determine if you are using 32- or 64-bit Excel
If you’re not sure, check by clicking the File menu > Account > About Excel.
Click to enlarge
2. Download and install the ODBC driver
ODBC lets you connect directly to your Reason Automation database, to pull data into Microsoft Office programs like Excel and Power BI. Download the driver from the links below, choosing the download that matches your 32- or 64-bit version of Excel.
Some versions of Windows will present an additional security warning. Click “More Info,” then “Run Anyway.”


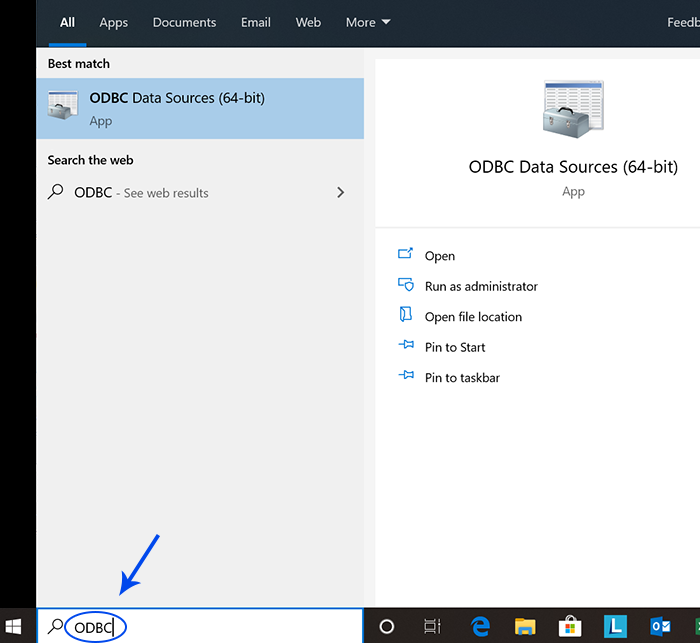
3. Search for ODBC
ODBC does not automatically create desktop or startup shortcuts. After installing, find and open the ODBC Data Sources program by using the Windows search bar. We recommend creating a shortcut or “Pinning” to the Start menu.
4. Connect ODBC to Reason Automation
Next, you will configure a connection to your Reason database. First, add a new Data Source Name (DSN) by clicking Add… .

You will be prompted to select a driver from a list. Choose PostgreSQL Unicode, then click Finish.

In the next setup screen, fill out the following fields.
  Data Source:  [Whatever you want, e.g. "My Amazon Data"]
  Database:     [Your database]
  Server:       [Your server]
  Port:         [Your port - usually 5432 or 4527]
  User Name:    [Your database user name]
  Password:     [Your database password]
Your database user name and password were emailed to you during account setup. If you have lost your database user name or password, and need your credentials reset, please contact us.

Click Test to validate - you should see a “Connection successful” pop-up. Click Ok, then Save your connection details.
5. Connect ODBC to Excel
Last you will connect ODBC to Excel, allowing you to import your Amazon data directly into a workbook. In Excel, click the Data menu > Get Data > From Other Sources > From ODBC.

From the drop-down menu, choose the name of the data source you set up in step 4.

FOR SOME VERSIONS OF EXCEL: you may need to re-enter your database user name and password one final time.

6. Congratulations!
You should now have direct access to all of your Seller Central and/or Vendor Central reports from within Excel. Each report is stored as a table in your database, e.g. “inventory_all_listings". Select the table you want and either:
Click Load to import the entire report into Excel.
Click Transform to choose which columns, date ranges, and other views to import.